Mittwoch, 16. März 2022

RRF - Loops and Conditional Gcode

Description

Since version 3.01 of the Reprap Firmware, a bunch of meta commands are supported that include conditional gcode and loops. This is a rarely used feature but it can be very useful for more advanced macros or even print jobs. But what is it exactly? 
Conditional gcode is pretty much what you might guess, it allows executing parts of the code only if certain conditions are met using an "if" statement much like in any programming language. And loops can be used to execute part of the gcode over and over again until some condition is met. These structures are well known in most programming languages but is still somewhat unusual in the world of gcode.


Example

The following gcode is used to test the repeatability of a bed probe 6 times in a row and report the result and statistics of the test. In this case it would be simple enough to just run G30 command 6 times in a row, but it demonstrates how the meta codes can be used and would allow for easy parameterizing, running it N times:

G28                   ; home printer
G1 Z5 F300            ; lift nozzle to x=5mm
G1 X125 Y100 F3600    ; move toolhead to center of the bed

echo "Testing Z-Probe 6 times and reporting statistics"
while true            ; start a loop without exit clause
                      ; 'iterations' is a built in variable starting at 0
    G30 P{iterations} X125 Y100 Z-99999 F5000        
    ; lower toolhead until probe triggers, append result
    G1 Z5 F5000       ; lift nozzle back up to 5mm
  
    if iterations == 5    ; test if the variable itearation has reached the value 5
        G30 P{iterations} X125 Y100 Z-99999 F5000 S-1    
        ; lower toolhead until probe triggers, append result
        break    ; exit the loop

This example utilizes the  conditional "if" statement as well as the "loop" function and the internal variable "iterations". Please see docs.duet3d.com for more information.

Freitag, 10. April 2020

Craftbot 3 Support G-Code

Chief Engineer's log..

Stardate -302747.32657862775

The Craftbot 3 supports gcode, but as it uses a closed source firmware which means what codes it supports can't be looked up in the usual reprap place (Gcode) or in the documentation of a 3D printer firmware such as marlin or reprap_firmware. Craftunique has a list of supported codes on their support page, but these are generic and not machine specific and it doesn't offer a great deal of documentation. The CB machine supports quite a few commands in the M1xxx range that aren't standard and are very specific to the Craftbot printers. Luckily it is possible to query the printer for its supported gcode using M1000 which returns a list of supported gcode. This Blog tries to list the supported codes and give a brief description of its use. A very good place to find such a list can also be found on https://www.craftbot.nl which offers very useful information about the Craftbot printers in general. But it is not CB3 specific and list codes not supported by this machine.

I will update this list as i get more information on the individual codes. for now its as is reported by M1000.

G-Codes

G0: Linear move: E F S X Y Z
G1: Linear move: E F S X Y Z
G2: Draw lin arc: E F I J U X Y
G3: Draw lin arc: E F I J U X Y
G4: Dwell: P S
G20: Set units to inches.
G21: Set units to millimeters.
G28: Move to origin: X Y Z
G90: Set to absolute positioning.
G91: Set to relative positioning.
G92: Set position: E S X Y Z
G101: Relative linear move: E F X Y Z
G197: Pause.

M-Codes

M18: Disable stepper motors.
M73: M73 progressbar refresh: P S
M82: Set extruder to absolute mode.
M83: Set extruder to relative mode.
M84: Stop idle hold: S
M104: Set extruder temperature: Q S T
M105: Get temperature of extruders and bed: P T
M106: Turn cooling fan on: S T
M107: Turn cooling fan off.
M109: Set and wait head temperature: Q S T
M110: Print Start or Stop: S
M114: Get current position.
M115: Get firmware version.
M140: Set bed temperature: H L S
M190: Set and wait bed temperature: S
M220: Set speed override percent: S
M221: Set extrusion override percent: S
M300: Play beep sound: P S
M422: Start Head Preparation.
M423: ...: E F T
M424: ...: E F
M425: Set nozzle wipe position: S
M430: Head change ZHop settings: F Z
M431: Head change Exit Retract settings: E F
M432: Head change Enter Retract settings: E F
M433: Head change Enter Prime settings: E F
M900: Linear advance beta version: A D K
M1000: Print supported G and M codes
M1001: Get Printer Version.
M1002: Get unique ID: S
M1003: Get firmware version: S
M1004: Get HMI version.
M1005: Get HMI board version: S
M1006: Set limits s=1 Case / S=2 Head: H L S T
M1014: Get ADC values: S
M1015: Get PWM duty.
M1114: Get machine coordinates.
M1115: Get queue.
M1123: Set T7 pin high or low: S
M1160: Fan control (Case,Dome,Head,Obj): C D H O T
M1200: Set feed properties: F H L
M1202: Set axis soft limit: E X Y Z
M1203: Set XY acceleration: A D F
M1204: Set Z acceleration: A D F
M1210: Set extruder correction: F K
M1212: Set thermal runaway: Q S
M1300: Set extruders PID: D F I P W
M1301: Set bed PID: D F I P W
M1400: Start heating and waiting: B E H P Q T
M5000: Set XY Z jog feed: X Z
M5001: Set mechanical parameters: E X Z
M5002: Set XY offset: X Y
M7001: Set WIFI SSID/Pass.
M7005: Set e-mail address.
M7008: Overwrite Wi-Fi SSID.
M8010: Read errors.
M8020: Set thermal motor warning: S
M9006: Set print mode: Q S X
M9090: Set parser limits: S X Y Z
T0: Select tool 1: F S X Y Z
T1: Select tool 2: F S X Y Z

Sonntag, 23. Juni 2019

Converting Craftbot Plus to V6 Hotend

Chief Engineer's log..

Stardate -303524.4823059361

For some time i wanted to modify my Craftbot Plus to the V6 hotend ecosystem as it offers more possibilities and part availability for future projects and general maintenance. This is a quick write-up of the modifications i performed:

Required Items:

BOM:
  • 1x V6 Heat sink
  • 1x V6 Heatbreak
  • 1x V6 Heater Block
  • 1x V6 Heater Cartridge (24V, 40W, optional)
  • 1x V6 Thermistor Cartridge (100kOhm NTC, optional)
  • 1x MK8 heatbreak (40 mm long)
Tools:
  • 1x Saw
  • 1x File
  • M6 Thread Tap
  • 5 mm Drill
or alternatively a mill with appropriate endmills and a lathe.

Modifying V6 Heat-Sink

The standard V6 hotend cannot be directly mounted to the Craftbot Plus and has to be modified prior to be mounted. First the heat sink has to be milled flat on one side (Alternatively this can also be accomplished using a file). The new width of the heat sink should be about 18.5 mm but no more than 19 mm, otherwise it will not fit under the extruder mount.
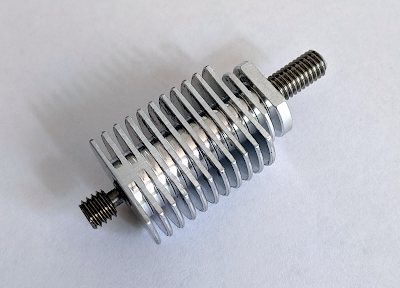
The second modification is to remove the upper part of the groove mount. Leave the lower side of the mount as this ensures the correct length of the heat sink. I used a lathe to do this but a saw and a file should do as well, just make sure to work slow and the  top of the heat sink is perpendicular to the sides. The heat sink should now have a length of about 33 mm and look something like this:


the last modification required to the heat sink is to drill out the center width a 5 mm drill and tap it with a M6 screw tap all the way through.  When this is done all that is left is to clean up all the edges and remove any leftover metal chips from the modification. Lastly clean the M6 thread with rubbing alcohol to remove any leftover oils or fats

Assembly

First screw in the new V6 heat break as far as you want it to (align the M6 thread with the lower end of the heat sink). Then apply a bit of loctite to the one end of the mk8 heat-break and screw it in as far as it goes until it hits the V6 heat-break. tighten it down (only finger tight) and let it cure. When cured, cut the M6 thread to length so it ends just before it is touching the drive gear or the idler (about 13 mm of the M6 tube should stick out the heat sink)


Once the heat sink is assembled it can be mounted in the Craftbot Plus using the same method used for mounting the original hotend. The only thing left to do now is replace the thermistor with a cartridge type if the newer version of the heater block is used (for the older type, the original thermistor can be used) and the printer is ready to print again.


Modifying the Starting gcode in your Slicer

The firmware has peculiar function that regulates the extruder fan as a function of the set temperature. Unfortunately the default setting that is used uses a to low setting to properly cool the V6 heat sink. If nothing is done heat creep will occur and clog the nozzle. Luckily there is a way to modify the parameters used to calculate the fan speed using the M1006 gcode as reported here: https://www.craftbot.nl/. Setting the variable H to 350 works quite well for me. Hence i added the following line to my starting gcode:

M1006 S2 H350 ; spin the extruder fan faster


The modification is all done now.
Happy Printing!

Mittwoch, 28. November 2018

Chief Engineer's Log - Purpose

Stardate -304090.7343036529,

I finally got myself to start a blog about my more geeky hobbies. The purpose of this blog is on one side to be kind of a lab a journal for myself and on the other hand to share my designs and findings with whoever is interested in them or finds value in them for their own projects. Source code, documents and designs of mine can be found either on github: https://github.com/Battosai42 or Thingiverse: https://www.thingiverse.com/Battosai13


Focus of this Blog:

  • 3D printing
  • CNC
  • Electronics
  • Pen and Paper RPGs (D&D etc..)